Happy Monday! I hope you had a good weekend, ours was good but went by super fast!
This week, I'm committed to eating healthy. The past few weeks I had been eating hummus and veggies for lunch but last week I was just not excited to eat that anymore. I started venturing out to find other food which led to Chick-fil-A and that's not healthy.
So, I changed my lunch menu and am having salads this week. Ahh salad, I need more than just some veggies to be excited about a salad so here's what I put in today's salad-
Kale, Spinach, and Lettuce I picked from my garden this morning!
one yellow and one red mini sweet pepper sliced
half a roma tomato
slices of laughing cow swiss cheese
a dollop of Greek yogurt with dry ranch dressing mix stirred in.
My tip of the week that I looove is mixing the dry ranch mix in with greek yogurt!! You feel like you are eating something rich, delicious, and bad for you but it is fat free and 70 calories for an entire serving. Try it! It's amazing.
Have a good one, see you tomorrow!
Monday
Flooring and Leaks
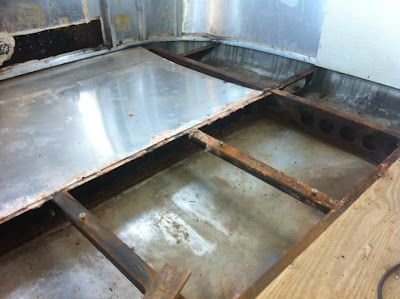
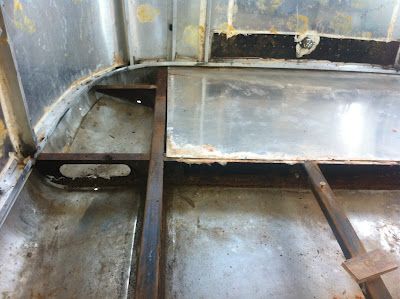
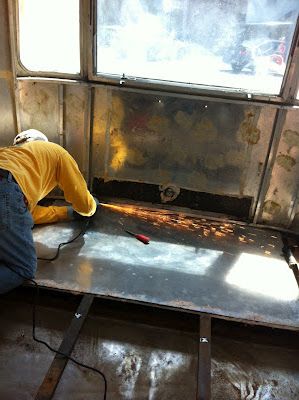
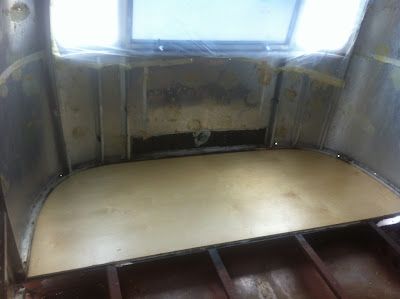
This weekend we continued to work on the floor. We are about 1/3 of the way done replacing the floor!
We also filled up our fresh water tank for the first time to test it out. It didn't leak and all seems to be good with it so we are going to keep it and continue putting new pieces of flooring down.
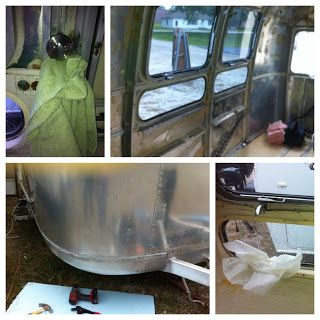
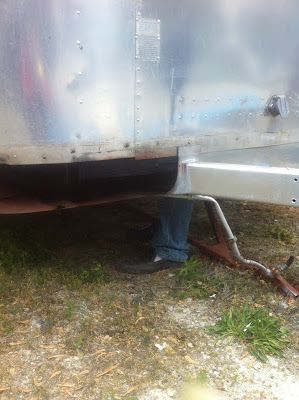
While we were working on the Airstream this weekend we had a huge rainstorm which ended up working out really well for us to find all the places that leak in our Airstream!
We went around with vulkem and patched all of the leak spots. Mainly we had leaks around our tail lights, around the lower small windows, the door lock, and one random hole in the shell so not too bad!
We had rain all weekend so, after we filled in the problem areas we haven't seen anymore leaks.
Lastly, we got to put the banana wrap back on the front right side. The left is still open because we need to be able to bolt our next piece of flooring in from that side.
This week's work felt great because we are no longer deconstructing we are making her water-tight and beautiful!
Friday
Friday's Letters
Dear Garden, I'm having so much fun planting new things in you, taking care of you, and getting to eat the basil, cilantro, lettuce, kale, and spinach you are growing!
Dear Airstream, I was really worried last night that the piece of new flooring we got for you wasn't going to fit but, it worked out and I'm so happy you are getting a new floor!
Dear Husband, I'm always amazed that we are able to conquer all of our projects without frustration and fighting. Thanks for being so calm, smart, and kind, you're really the best!
Dear Costco, I'm so excited to come visit you and stock up of your giant bag of chocolate chips and whatever else I find in your aisles this weekend.
Dear Diptic, you are an awesome app, I will probably be using you all the time now that I've discovered you (it is the app that created the above photo collages)!
Happy Friday, have a fantastic weekend!
Wednesday
In The Sperry Club
Thanks for my new shoes Gimme!(That's what I call my grandma)
I've been eyeing Sperrys for a long time but never joined the club.
I got the Women's Authentic Original 2-Eye Boat Shoe in Sahara because they are classic and go with lots of things! I've been wearing these for about a week now and they are so comfy!
They are suppose to be my 25th b-day present from my grandma but I got them a little early:) She said I could open the package and wear them even though it's not my b-day yet, it's May 28th! That's one of the great things about my grandmother, she totally still spoils me even though I'm about to turn 25!
Tuesday
The Best Kale Salad Ever
There is a local restaurant called Unforked here that has a Kale salad that actually makes me want to eat Kale.
The whole reason I grew Kale in my garden is because I wanted to be able to make this salad.
If you didn't know, Kale is a super food! It is crazy healthy for you.
I made one serving of this delish Kale salad for part of my dinner because I am able to pick as much a I want to eat straight from the garden and then do it again tomorrow. So, here is the way I made it but it only makes one serving size:)
Bowl full of Kale- Wash and dry, then tear it up into little bits about 1x1 inch roughly
1 tsp lemon juice
1 tsp olive oil
dash of salt
a pinch or more of Parmesan Cheese (put how ever much you prefer in)
toss your ingredients together and booyah, you have yourself a really yummy salad!
Monday
Out With The Old Subfloor and In With The New
Ever since we bought our Airstream we knew the day would come when we would take out the old sub-floor and see if our frame was rusted out or if we would get lucky and find it completely dry underneath with no problems!
Well, this past week, we removed the front section of floor. The plywood looked like it had some water damage but thankfully the metal frame wasn't too bad! We had some rust and some rivets come unattached from the belly pan but we could work with it.
To remove the front piece of ply wood we cut it into pieces with a circular saw, chopped at it with a hammer, and wrestled it out. We tried un-bolting and un-screwing it but, the bolts and screws holding the plywood in place were rusty and impossible to move. Once the wood came out we got the grinder after the remaining bolts and screws.
To prevent any further damage from rust on our frame, we cleaned all the rust off we could with a wire brush. Then we spray painted all of the metal with Rustoleum Rusty Metal Primer then gave it a top coat of enamel spray paint.
We bought a new piece of ply wood and cut it to fit the front section of the Airstream. We made a template with a piece of foam and then used that to trace our cut we needed to make on the plywood. Once the wood was cut, we painted it with two coats of Polyurethane to protect it from any water that may try to sneak in (water is tricky like that!).
Once the spray paint and poly were all nice and dry we laid down some insulation. Then, it was time to put the new piece of flooring in. The plywood goes into a track at the base of the shell of the Airstream walls. We got the plywood into the track on the right side and then hammered the piece into place about 1/2 an inch at a time. It is a tight fit and the wood doesn't slide in easily but, once we pounded our piece into place it felt nice and firm. We went around the edges and re-bolted the places near where there were bolts before (we had to redrill some holes to hold our new bolts).
We went around with Vulkem to water-proof specifically around the metal sheet where the spare tire goes.
Next up we will keep replacing the old flooring until we get to the water tanks then we will see what kind of shape they are in before we continue laying new floor. We will also put the front two pieces of banana wrap back on since we had to take it off to put the bolts in around the edges of our flooring.
This has been my favorite project so far in our Airstream renovation because we are adding to the structural integrity of our trailer and hopefully adding many many years to it's life!
How to Grow Your Own Sweet Potatoes
Hello! This weekend we did alot of Airstream renovating which you can read about here and lots of gardening! Now that we have our own house, the projects are never ending and there is never a dull moment! I sleep like a log at night on days like this weekend because we work for hours and hours. This type of work is so satisfying to me. The first few months of owning our home were chaos because there was so much to do. Now, we have several rooms done and it is much more enjoyable to continue working hard on our house but not have the whole thing a crazy mess!
So, my favorite thing I planted this weekend were the sweet potato slips I've been growing in the kitchen window for about a month and a half. Here is what the original sweet potato with slips all over looks like-
To grow sweet potato slips, you need to half-way immerse a clean sweet potato in water (this one was in my pantry, it just came from the grocery store). The place you set your sweet potato needs to be warm. After about 2 weeks you will start to see roots growing. After about a month you will finally see slips start to grow. Let the slips grow a good 3-4 inches. When they are big enough, just break the slip off the sweet potato at it's base. The slip will have a few roots growing. Immediately plant up to the first set of leaves and water! Now nature will take it's course and in a few months I hope to have some sweet potatoes!
This weekend I also planted yellow, green, and red bell pepper seedings. The bell pepper seeds I planted never came up. I also planted a mint seedling. The mint seeds I planted also never came up. FYI, Home Depot is having half off their Bonnie Herbs and Veggies this week in honor of Earth Day! (That's where I got my seedlings).
We also mowed, I weeded the veggie garden, planted two rose bushes and some flower seeds. Gardening in my own yard is so fun! There is always something I can do to make it better like weeding, watering, fertilizing, but the amazing thing to me is, things actually grow without a lot of help from me. The seeds or plants get put in the dirt and they just know what to do. Crazy how nature works!
Happy Monday, hop over to our Airstream blog later if you get the chance!
So, my favorite thing I planted this weekend were the sweet potato slips I've been growing in the kitchen window for about a month and a half. Here is what the original sweet potato with slips all over looks like-
 |
| Roots and Slips growing off the original sweet potato |
 |
| One of the slips planted in the garden |
This weekend I also planted yellow, green, and red bell pepper seedings. The bell pepper seeds I planted never came up. I also planted a mint seedling. The mint seeds I planted also never came up. FYI, Home Depot is having half off their Bonnie Herbs and Veggies this week in honor of Earth Day! (That's where I got my seedlings).
We also mowed, I weeded the veggie garden, planted two rose bushes and some flower seeds. Gardening in my own yard is so fun! There is always something I can do to make it better like weeding, watering, fertilizing, but the amazing thing to me is, things actually grow without a lot of help from me. The seeds or plants get put in the dirt and they just know what to do. Crazy how nature works!
Happy Monday, hop over to our Airstream blog later if you get the chance!
Saturday
How To Refurbish Airstream Emblems
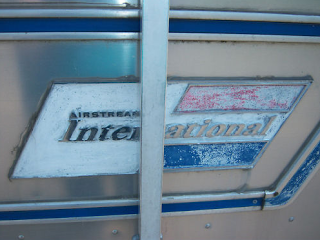
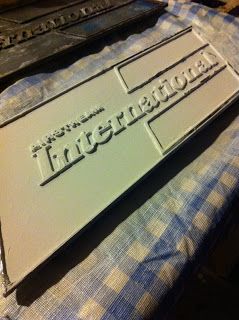
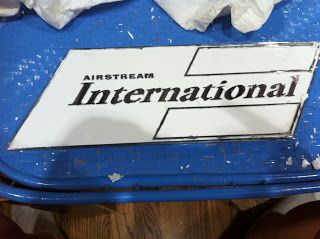
As you can see, our Airstream emblem needed to be refreshed.
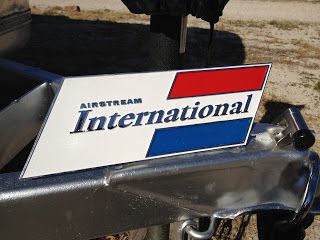
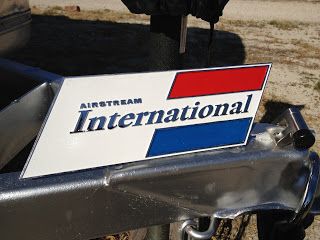
Here's how I went from the above picture to this!
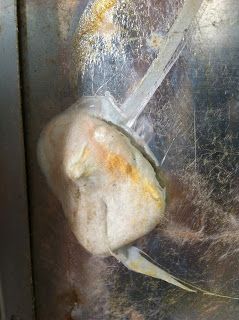
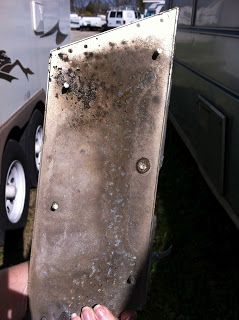
First, removed the emblem but, in order to do that you have to remove the inner skin off the Airstream to get to the posts on the inside of the outter skin. The emblems are held on by posts that are attached with a type of nut then covered with vulkem to make it waterproof. Here's what it looks like-
Back of the Emblem
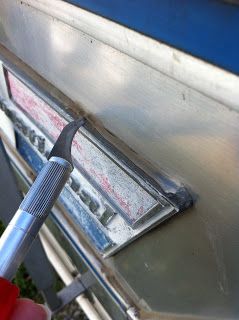
My emblem had silicone around the edges also so I had to run around that with an exacto knife.
Once you get the emblem off, it's time to clean off the dirt and old paint.
I first covered the emblem with Citristrip paint stripper. The scrubbed and rinsed. This got alot of the paint off but not all.
Next, we polished the emblem with rouge and a polisher. This brought the letters to a beautiful shiny finish.
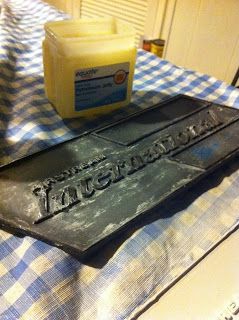
Next up is painting. In order to protect the letters from paint you need to cover the letters with a thin coat of Vaseline. I used a Q-tip and my finger to keep the Vaseline only on the letters that you don't want paint on.
Next, spray paint the entire emblem with white glossy spray paint for metal. I did two coats.
After the emblem has 24 hours to dry, scrape the Vaseline off the emblem. I used my finger nails and an exacto knife.
Next, I used oil based model/hobby paint from Michael's to paint the red and blue areas. To do this, I dipped a small paint brush in the paint and dropped it in the square. The paint runs into the corners without having to use too many brush strokes. Allow the paint to flow on it's own and guide it with the brush. This will give the paint a thick professional look. I gave each color two coats.
Lastly, I sprayed two coats of glossy clear coat over the whole emblem. This gives the work you've done protection from the elements and a nice glossy finish!
I still need to do this same process for the Airstream Letters that go on the front and back of the trailer. I plan to use the same blue hobby paint that I used for this emblem to repaint those, I'll update when I get to that!
Thursday
Needlepoint!
A few weeks ago I posted about how I loved needlepoint belts and wanted to make one here. Well, I just finished my first trial at needlepoint. I made a TCU bookmark!
I tried to replicate the TCU letters and I think I got pretty close, I'll keep working on it. Working on needlepoint is great for me when I want to feel productive while watching tv. To get the letters on the needlepoint canvas I traced a printout it with a pen and then went to town needlepointing.
I still plan on making a belt!
Wednesday
Secret Ingredient Dessert- Chocolate Shake
MMMM, I love chocolate ice cream in any form. But this one doesn't have any actual ice cream, dairy, white sugar...
So what could the secret ingredients be to make this rich chocolately deliciousness?
Here's the recipe!
1/2 avocado (this gives it the creaminess!)
1 cup vanilla almond milk
1 tbs cocoa powder
1/2 tbs agave nectar
about 6-7 ice cubes
chocolate syrup for a fancy looking garnish
Blend all of your ingredients except for the chocolate syrup together and enjoy.
recipe adapted from this blog post!
You can feel pretty good about drinking this chocolate shake since it looks and tastes like a shake but isn't actually one!
Monday
Home Grown Greens
It's harvest time in the garden! The lettuce and spinach are big and beautiful. I ate some for lunch and dinner today and it was fantastic! I'm never this excited to eat spinach or lettuce but, when I grew these plants from seeds, it just makes me so amazed that I can eat them!
Tonight I made a delicious Salmon and Citrus salad on a bed of my home grown spinach and lettuce.
To make the salmon I seasoned with salt, garlic, and pepper. Placed about a tablespoon of butter on top and covered it with chopped parsley. Then I placed it on the grill for about 10 minutes! I put the fish on a piece of foil so it wouldn't fall apart on the grill.
To make the dressing I combined the following-
Juice of 1 lemon
Juice of 1/2 an orange
chopped clove of garlic
tbls chopped parsley
1/4 cup olive oil
splash of vinager
This salad was flavorful and amazingly good y'all. I would say it tasted like summer! I will make it again very soon!
Friday
Wednesday
Swimming With a Turtle
I just got these pics from our Ship's Captain/Dive Master today and had to share! Thanks for taking these awesome pics Captain Tim!
When Matt and I went on our awesome trip to the British Virgin Islands a month ago we got to Scuba dive with this little guy, isn't he so cute!?
When Matt and I went on our awesome trip to the British Virgin Islands a month ago we got to Scuba dive with this little guy, isn't he so cute!?
 |
| Oh hey there Crush! |
 |
| Matt and I enjoying our little turtle friend up close and personal |
 |
| Don't leave! |
 |
| Come to me little turtle |
 |
| Thanks for entertainment little guy! |
Monday
Growing Garden
Sunday
A Happy Easter
My twin brother came to visit us this weekend and we had a little Easter lunch after church.
We missed having the rest of our family here too! I hope you had a good weekend!
I get Monday off! Praise the Lord!
 |
| yellow cake with chocolate cream cheese frosting |
 |
| In our Easter clothes |
 |
| Deviled eggs, fried chicken, mac n cheese |
 |
| We dressed down for lunch |
We missed having the rest of our family here too! I hope you had a good weekend!
I get Monday off! Praise the Lord!
Subscribe to:
Posts (Atom)


